|
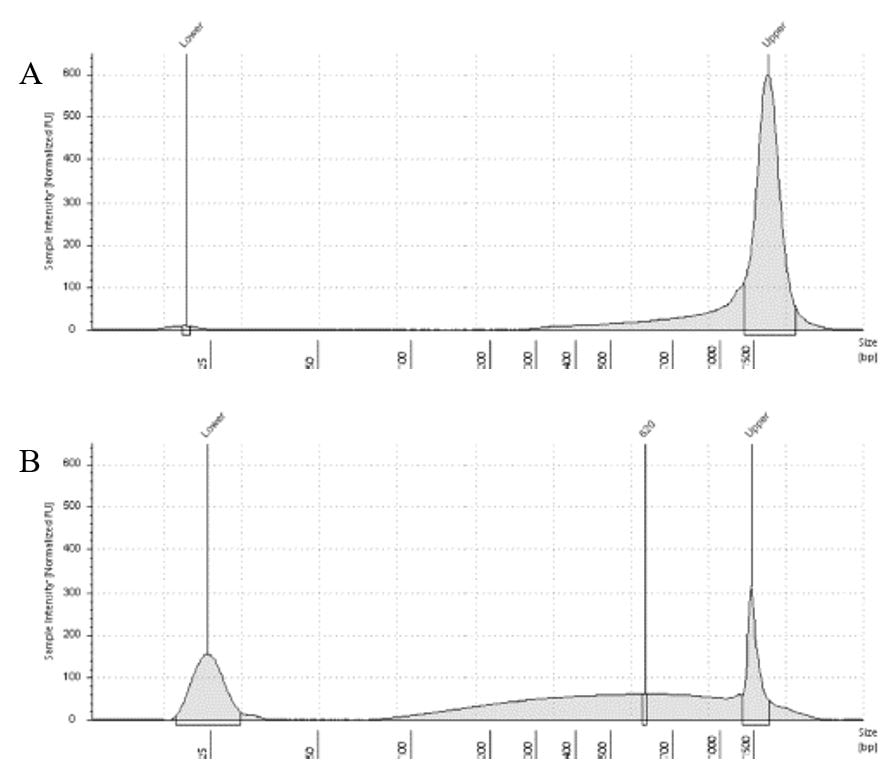
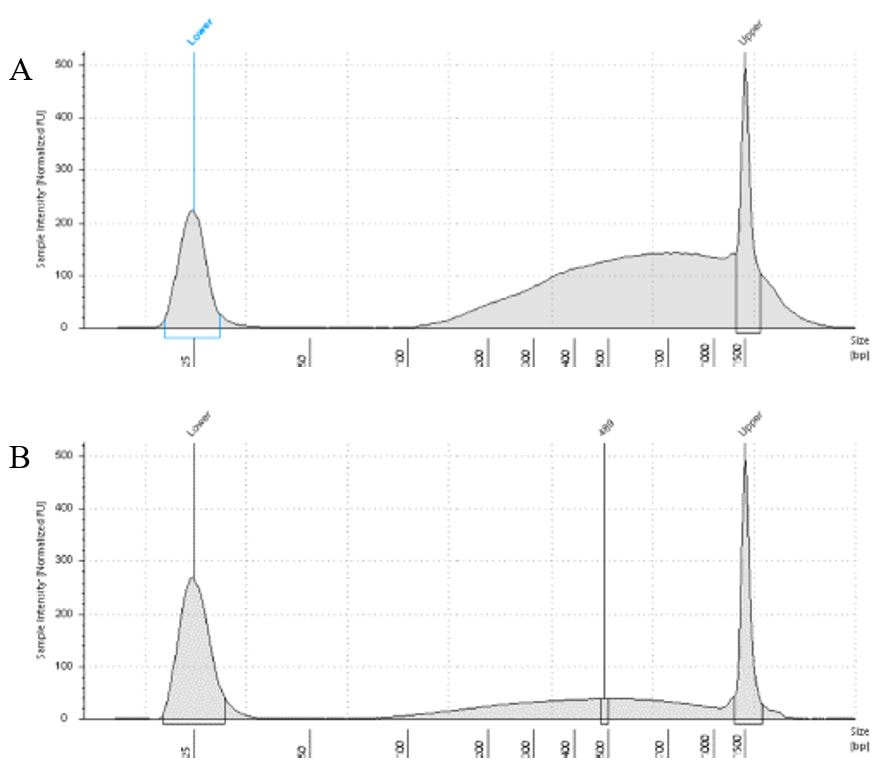
The lab has been getting the molecular protocols for next-gen sequencing up and running. One of the primary tools we have for our phylogenomics work is to do low-coverage genome sequencing on an Illumina sequencer. For the short-read sequencing, we actually NEED fragmented DNA (we're targeting 250-600 basepairs total to submit to sequencing (with adapters, etc.). We need to ascertain the quality of the DNA extract then make an educated guess as to how long to shear the DNA to get it broken into the ideal size pieces. We have a lot of old specimens with degraded DNA, and then we may choose not to shear at all. We're using a Bioruptor here at WSU. After getting our sheared sample, we go through a Kapa kit-based library preparation in the lab. Although I think it's stressful to purposely fragment the DNA, as you'll see below, it is critical that you really commit to it and often do a few cycles in order to obtain smaller pieces -- the long fragments will not be useful downstream anyway! Guest post by postdoc Felipe Freitas.Felipe interprets results from comparisons done in the lab with super-high quality DNA (intact, long strands) vs. some that is expected to be degraded. The first step of preparing libraries for Illumina sequencing is fragmenting the input DNA into a desired range of ~300-600 bp. Typically, there are two ways for doing that: mechanic fragmentation and enzymatic fragmentation. Mechanical fragmentation has been more widely used because of many factors, but mainly because its unbiased and can be more consistent about the fragment size obtained. Besides these factors, despite requiring a higher initial investment (buying the equipment, which is generally a sonicator), throughout time it turns cheaper because you don’t need anything else than tubes to accommodate your DNA, and electricity and water for the machine to work. We are starting to setup our lab for preparing libraries to sequence Low Coverage Genome using Illumina technology. And, once we have a sonicator (Dianogene Bioruptor plus) available at WSU we decided to perform some tests to establish the best parameters to fragment the DNA we will be using for our projects. Most of our projects rely on museum specimens, which have, generally, DNA degraded in some levels. After consulting the available manual of the equipment (https://www.diagenode.com/en/protocols/dna-shearing-for-standard-and-plus-protocol), and a blog post (https://igatechnology.com/blog/exome-seq-dealing-with-degraded-samples/) about the same topic and having the same questions – samples with some level of fragmentation, we prepared an experiment to certify that our setup would produce the results we are expecting considering the kind of samples we have. For our experiment we selected two samples: one with a less degraded or more contiguous DNA, extracted from a fresh specimen, and another one with degraded DNA, extracted from a museum sample. it was expected that these samples would give us two different scenarios or levels of fragmentation, so we would be able to evaluate how different configurations of the sonicator will influence the different samples. We then undertook a TapeStation analysis for these two samples to have a sense of the distribution of fragment sizes in both samples before the sonication. The results show that our expectations were right, the fresh specimen had DNA with fragment sizes mainly longer than we were able to read with the screen tape we had currently available (Figure 1.A), which can detect fragments between 25 and 1500 bp. Conversely, the museum sample had a fragment distribution ranging between 100-1500bp, with a peak around 620bp (Figure 1.B), which is slightly above the mean fragment size we were targeting. We then used two configurations of the sonicator to fragment the DNA: the first one had two cycles with the machine on for 30 seconds and off for 60 seconds. While the second one had three cycles with the same pattern 30/60.  Figure 1: Fragment distribution on samples before sonication. A- More intact DNA. B- More degraded DNA. We had only high sensitivity tapes to use when conducting the experiment, that’s why we don’t see any peaks of fragments in A, but we infer that the peak is above the upper bound, considering that this is a fresh sample. The results of the first round, with two cycles, show that in fact the peak of concentration of our intact DNA was above the upper bound (Figure 2-A), because now we are able to see the peak around 700bp, which still above the fragment distribution we are targeting (300-600). However, for our degraded sample the distribution reached somehow the distribution and mean we were targeting. It was between 100 and 1000bp with the peak at 489bp.
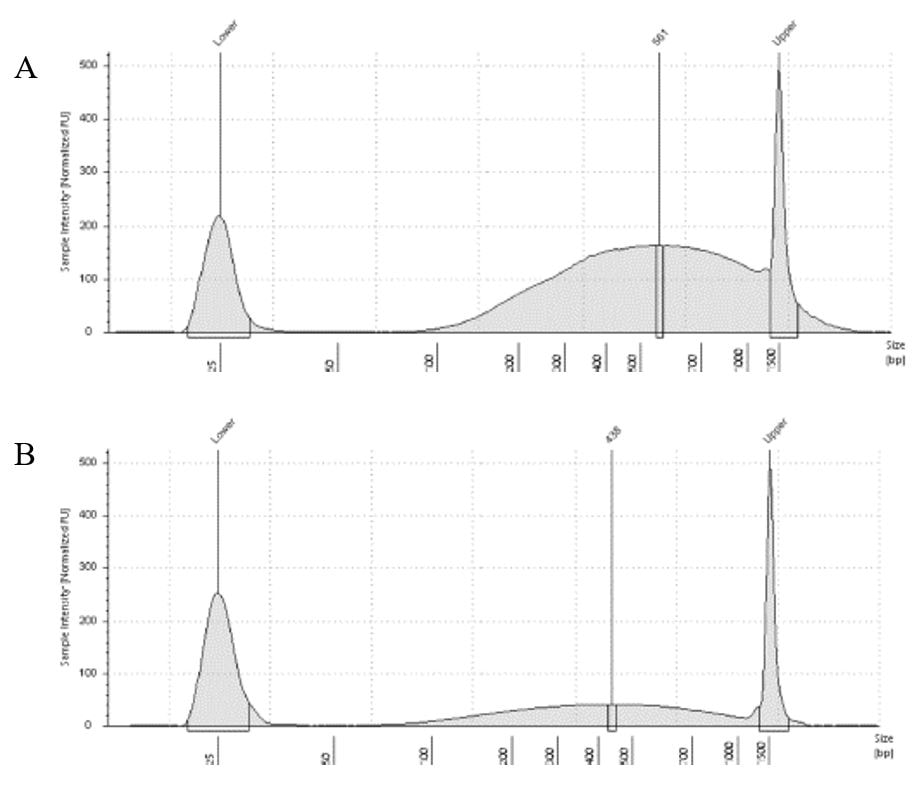
The results of the second round, using three cycles, showed a different pattern. The more intact DNA (Figure 3-A) now reached the fragment size we were targeting, with a peak around 560bp. On the other hand, the more fragmented sample (Figure 3-B) showed a peak around 438b, only a slightly difference compared to the results of when it was exposed to two cycles. In conclusion, we can say, that based on the results of this simple test, for museum specimens, two or three cycles of 30/60 on the Dianogene Bioruptor sonicator are enough to reach the fragment distribution of 300-600 when the DNA are not too fragmented as in the case of our museum sample. While for samples with high quality DNA (mean >1500bp), at least three cycles would be necessary to reach the fragment distribution needed for preparing Illumina libraries. However, it is important to highlight that our sampling does not represent the variation of DNA degradation (or fragment distributions) that can be found in museum specimens. The level of DNA degradation will, generally, vary according to many factors, for example: how the specimen was collected if using cyanide, ethyl acetate or ethanol; if it was dried in an incubator or not; if it was stored in desired conditions of temperature and humidity; etc.
0 Comments
|
what's new in the lab?posts about the things we're doing Archives
January 2024
Categories |


 RSS Feed
